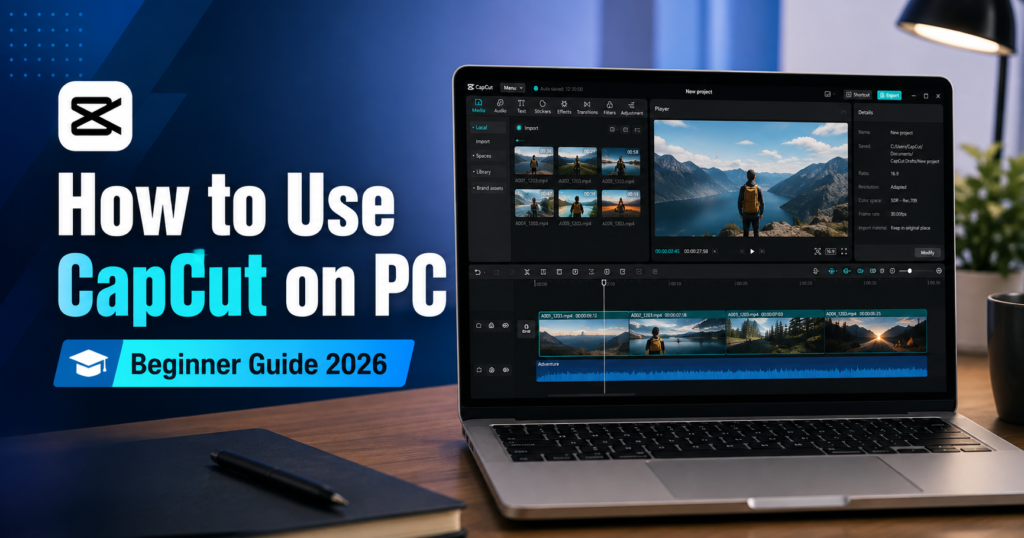
Learning how to use CapCut on PC for beginners is easier than it may seem. Although timelines, tracks, export settings, effects, and unfamiliar panels can look intimidating at first, you do not need professional video-editing experience to create a clean, watchable video.
This beginner-friendly guide takes you through CapCut Desktop step by step, from downloading the program and importing clips to trimming videos, adding text and music, trying AI tools, and exporting your finished video.
The good news is that you do not need professional editing experience to create a clean, watchable video.
This beginner-friendly guide explains how to use CapCut on PC, from downloading CapCut Desktop and importing your first clips to trimming, adding text and music, using AI tools, and exporting your finished video.
Everything is explained for someone opening CapCut Desktop for the first time. Follow the steps in order, and by the end you should have a finished video file that is ready to upload.
Affiliate Disclosure: This article contains affiliate links. If you purchase or sign up through one of these links, ByteTony may earn a commission at no additional cost to you.
Table of Contents
1. What Is CapCut on PC?
CapCut is a video editing platform available in several versions, including desktop, mobile, web, and tablet apps.
For this tutorial, we are focusing on CapCut Desktop for Windows.
| Product | What it is | Covered here? |
|---|---|---|
| CapCut Desktop | Full desktop editor for Windows and Mac | ✅ Yes |
| CapCut Online | Browser-based video editor | Mentioned only |
| CapCut Mobile | Mobile editor for Android and iPhone | Mentioned only |
| CapCut Pad | Tablet-focused version | No |
CapCut Desktop is a good place to start if you want more control than a phone editor provides. You get a larger preview window, a multi-track timeline, keyboard shortcuts, detailed audio controls, text tools, transitions, effects, and AI-powered features.
You can start with CapCut’s free editing tools and decide later whether any Pro features are actually useful for your workflow.
CapCut’s plans and feature availability can change by region, device, and app version, so this guide avoids assuming that every feature will appear identically on every account.
2. What You Need Before You Start
PC requirements
CapCut publishes minimum Windows requirements that are relatively modest.
For Windows, CapCut currently lists requirements including:
- Windows 10 or later
- Intel Core i3 or equivalent processor
- At least 4GB of RAM
- Compatible integrated graphics
- Enough free storage for the app and your project files
CapCut also recommends stronger hardware for smoother editing, particularly when working with high-resolution footage. A Core i5 or Ryzen 5-class processor, 8GB–16GB of RAM, an SSD, and stronger graphics can make larger projects much more comfortable to edit.
You do not necessarily need an expensive editing PC for short videos.
If you are editing simple 1080p clips for YouTube Shorts, TikTok, Instagram Reels, or basic YouTube videos, a reasonably modern computer may be enough.
However, performance demands increase as you add:
- 4K footage
- Multiple video tracks
- AI effects
- Background removal
- Heavy transitions
- Color effects
- Large projects
If playback becomes choppy, try closing unnecessary programs and reducing the complexity of the project before assuming you need a new computer.
An internet connection
Basic editing can be done locally, but several CapCut features rely on online services.
AI-powered tools, cloud features, online assets, syncing, and some templates may require an active internet connection.
Practice footage
Do not learn video editing using footage you cannot afford to lose.
For your first project, choose three or four short disposable clips from your phone or camera.
A simple practice project could contain:
- A five-second introduction clip
- A short talking clip
- A product or screen recording
- A final closing clip
Your first goal is not to create a masterpiece. It is simply to understand the complete workflow from import to export.
3. How to Download and Install CapCut on PC Safely
Avoid downloading video editors from random software download websites.
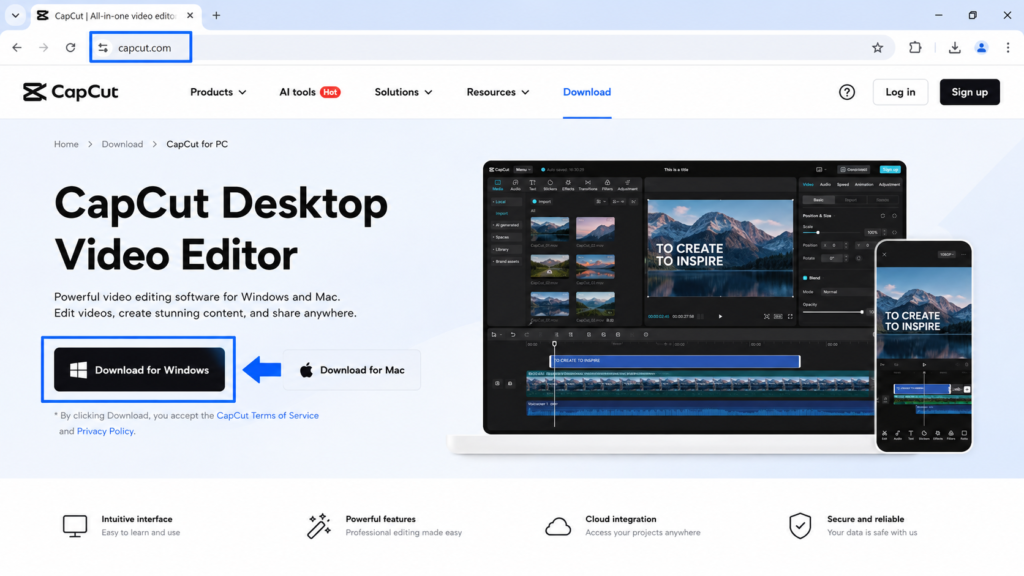
The safest option is to get CapCut through its official distribution page.
You can download CapCut for PC here.
Affiliate link.
After opening the page:
- Choose the desktop version for your operating system.
- Download the installer.
- Open the downloaded file.
- Follow the installation instructions.
- Launch CapCut Desktop.
[Screenshot 2: CapCut installer running]
You can use local editing features without relying on cloud storage, but signing in gives you access to account-based features and can make syncing and online tools easier.
If CapCut refuses to install, check that Windows is updated, that you have enough free storage space, and that security software is not blocking the installer.
4. A Quick Tour of the CapCut Desktop Interface
Before editing anything, spend a minute learning the main areas of the interface.
You do not need to understand every button.
Five areas handle most beginner editing tasks.
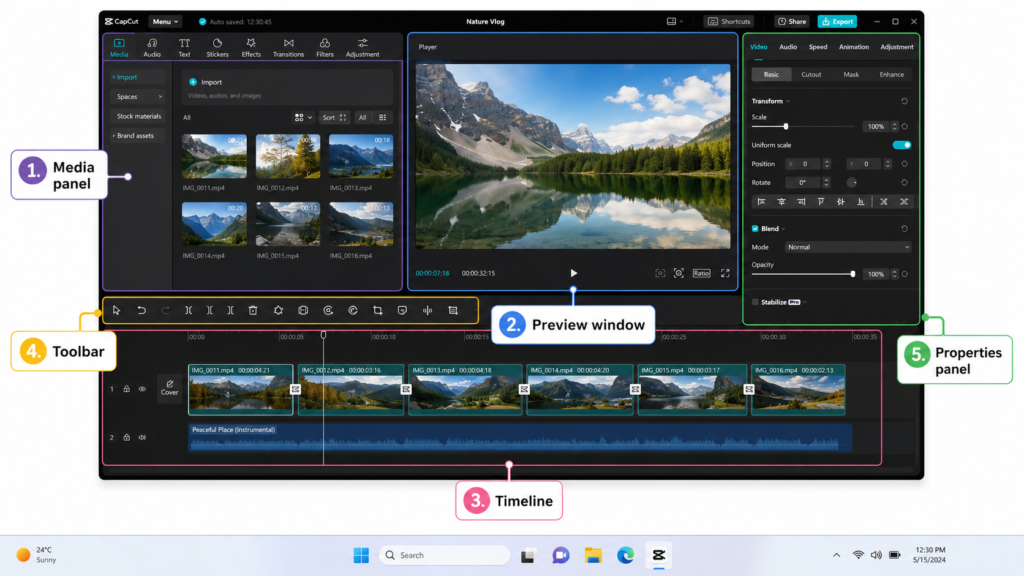
1. Media panel
Usually located toward the upper-left area.
This is where your imported videos, images, and audio files appear.
You may also find stock media and other CapCut resources here.
2. Preview window
This shows what your video currently looks like.
Move through the timeline and the preview changes accordingly.
3. Timeline
The timeline is where your actual edit is built.
Video clips are placed from left to right in the order viewers will see them.
Additional tracks can hold:
- Text
- Music
- Sound effects
- Overlays
- Images
- Additional video
4. Editing toolbar
The toolbar gives you quick access to common actions such as splitting, deleting, undoing, and adjusting clips.
5. Properties panel
The options on the right change depending on what you have selected.
Select a video clip and you will see video-related controls.
Select text and you will see text settings.
Select an audio track and you will see audio controls.
You do not need to memorize the entire interface.
Once you understand Media → Preview → Timeline → Properties, the rest becomes much easier.
5. How to Use CapCut on PC: 8 Beginner Steps
This is the main tutorial.
For the best learning experience, keep CapCut open while following these steps.
Step 1: Create a New Project and Choose Your Aspect Ratio
Open CapCut and select New project.
Before doing serious editing, decide where your video will be published.
Common aspect ratios include:
- 16:9 — standard YouTube videos and widescreen content
- 9:16 — TikTok, Instagram Reels, and YouTube Shorts
- 1:1 — square social media content
Starting with the correct format helps you avoid unnecessary cropping and repositioning later.
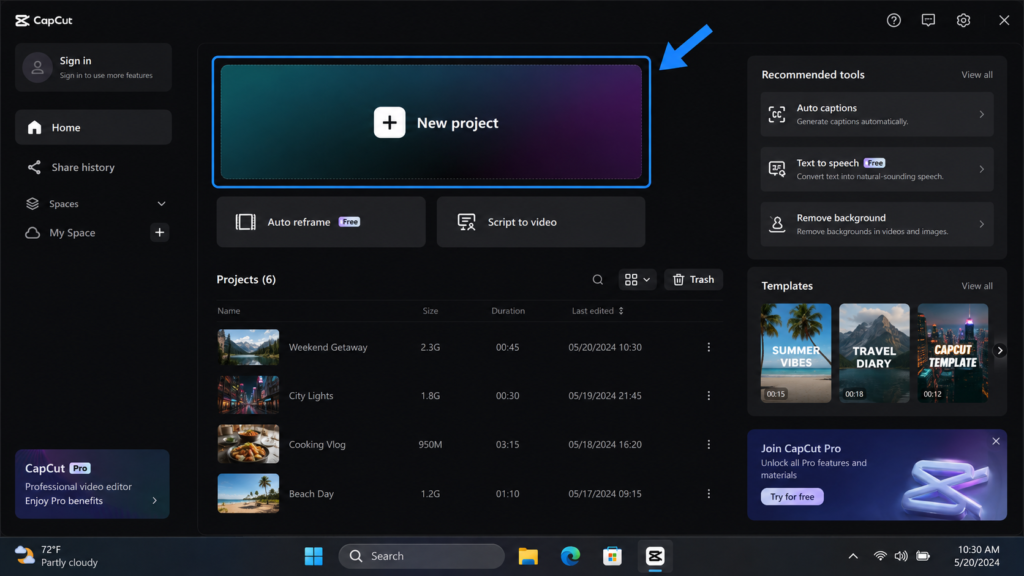
If you are making your first practice video and are unsure what to choose, use 16:9 for a normal desktop-style video or 9:16 for a Short, Reel, or TikTok video.
Step 2: Import Your Videos, Images, and Audio
Find the Media area and click Import.
Choose the files you want to use.
You can normally import common video, image, and audio formats, and you can also drag files from a Windows folder directly into CapCut.
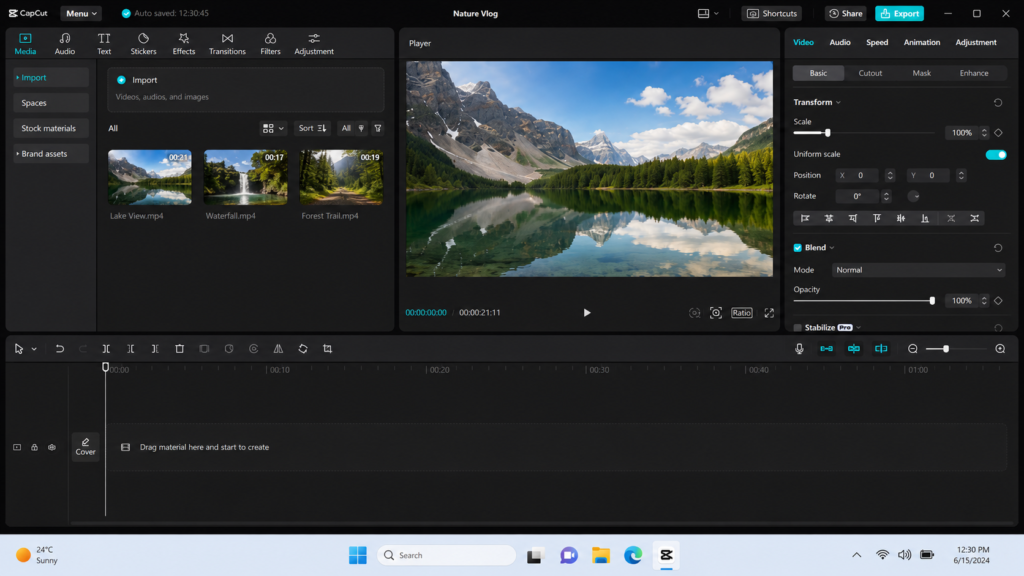
For your first project, keep things simple.
Import:
- Three short video clips
- One image
- One music track if needed
You will learn much faster from a 30-second project than from trying to edit a 20-minute video immediately.
Step 3: Add Your Clips to the Timeline
Drag your first video from the Media panel to the timeline.
Then drag the next clip after it.
Continue until the clips appear in the order you want.
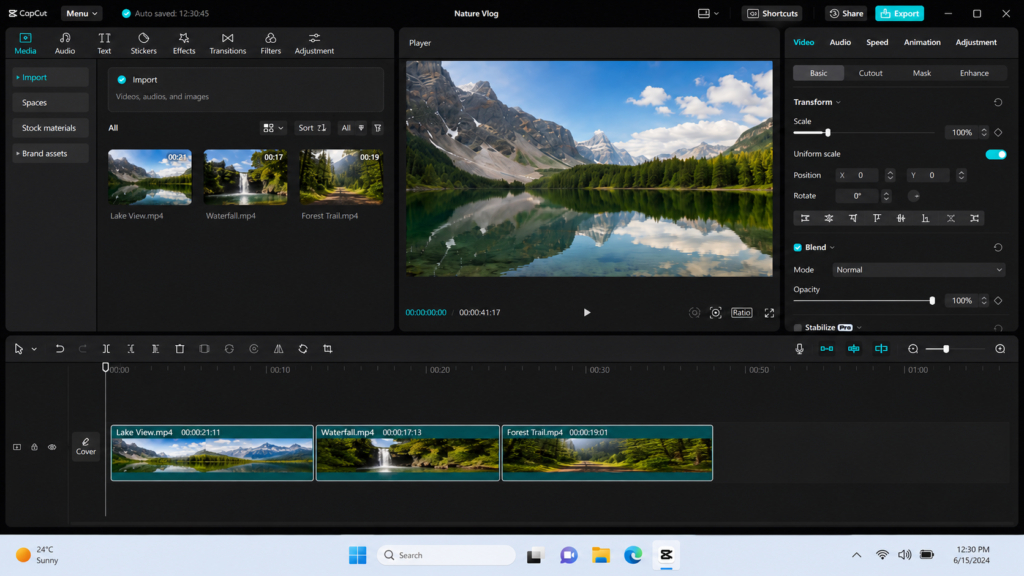
Think of the timeline like a sentence:
Left = beginning
Right = end
Your viewer sees the clips in that order.
You can drag clips left or right at any time to rearrange them.
Step 4: Trim and Split Your Clips
Learning how to remove unwanted footage is probably the most important beginner editing skill.
Suppose you recorded yourself speaking but waited three seconds before saying anything.
You do not want viewers watching those empty three seconds.
Move the playhead to the point where the useful part begins.
Then:
- Select the clip.
- Position the playhead.
- Click Split.
- Select the unwanted section.
- Delete it.
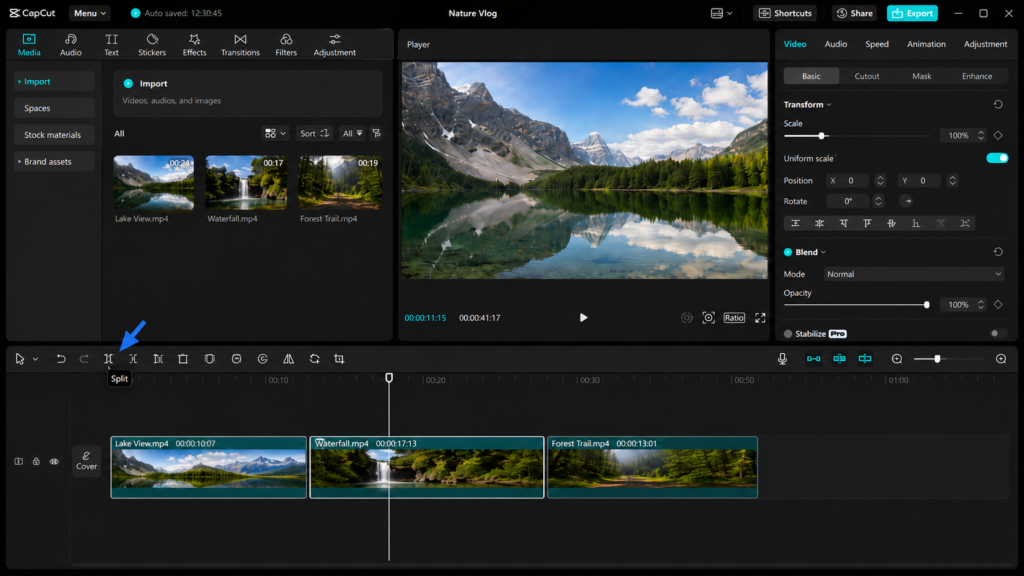
Repeat the process anywhere you want to remove mistakes, pauses, or unnecessary footage.
A simple beginner rule
Remove dead time aggressively.
Cut:
- Long pauses
- Camera setup moments
- Repeated sentences
- Obvious mistakes
- Empty footage before someone starts speaking
Good beginner editing is usually more about removing unnecessary material than adding impressive effects.
Step 5: Add Text and Titles
Open the Text section and add a text element to your project.
Place it on a track above your main video.
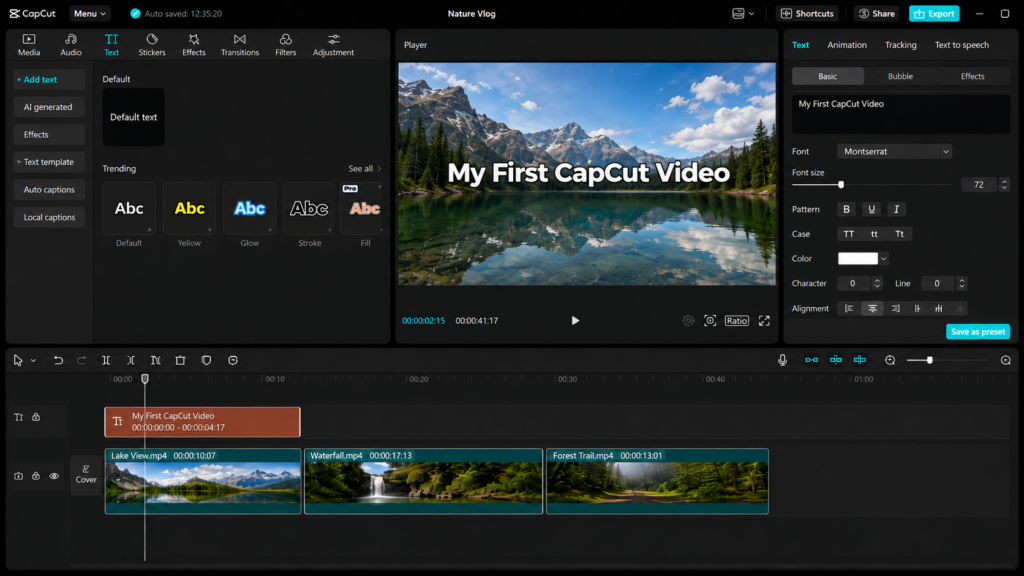
You could add:
- A video title
- Someone’s name
- A short explanation
- Product names
- Important numbers
- Calls to action
Keep text easy to read.
Avoid complicated fonts, extremely small text, and long paragraphs.
For vertical videos, also remember that social platforms place interface elements around the edges of the screen.
Keep important text away from extreme edges so buttons and captions do not cover it.
Want custom graphics for your videos?
CapCut can work with images you create elsewhere.
For example, you can create visual assets using free AI tools and then import them into your video.
ByteTony has a separate beginner guide explaining how to create AI images for free.
You can also see our step-by-step guide to the Canva AI Image Generator if you prefer creating graphics in Canva before importing them into CapCut.
Step 6: Add Music and Fix Your Audio Levels
Import an audio track just like you imported your videos.
Drag the audio onto an audio track below the video clips.
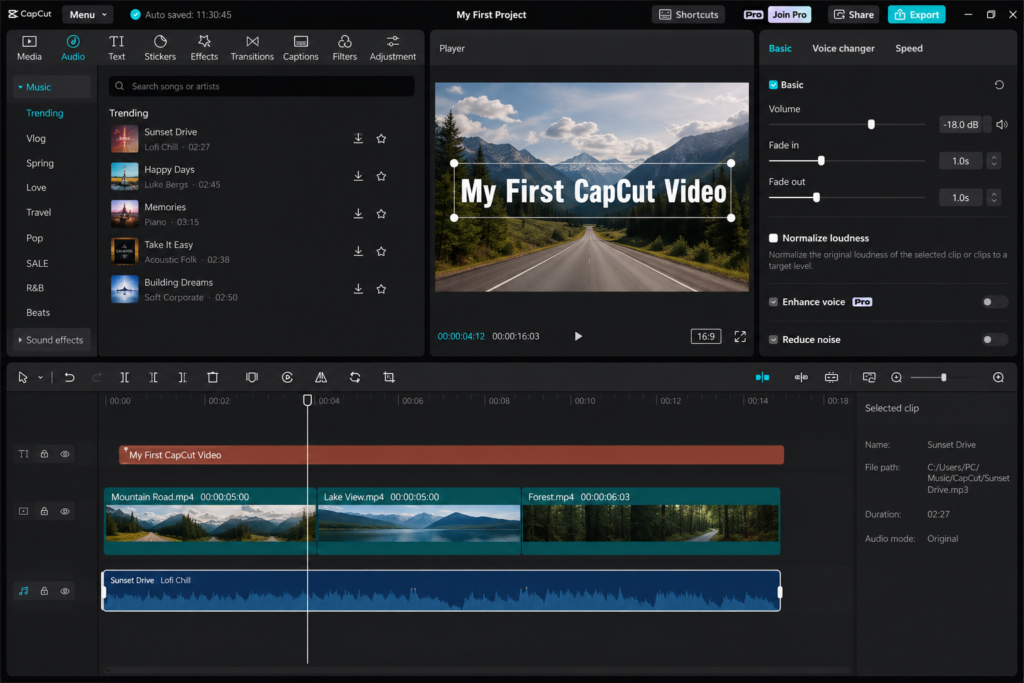
Now play your project.
If you are speaking in the video, make sure the background music does not overpower your voice.
This is one of the most common beginner mistakes.
Background music should support the video, not compete with the person speaking.
Select the music track and reduce its volume until speech is easy to understand.
You can also add:
- Fade in
- Fade out
- Sound effects
- Voiceovers
Always make sure you have the right to use music in anything you publish, especially monetized or commercial content.
If your project contains a lot of talking and you want more advanced transcription-based editing, another tool worth knowing about is Descript.
You can read our Descript review for YouTube beginners to see how its workflow differs from a traditional timeline editor like CapCut.
Step 7: Add a Transition — But Do Not Overdo It
Transitions control how one clip moves into another.
Open Transitions and choose a simple option.
Drag it between two clips.
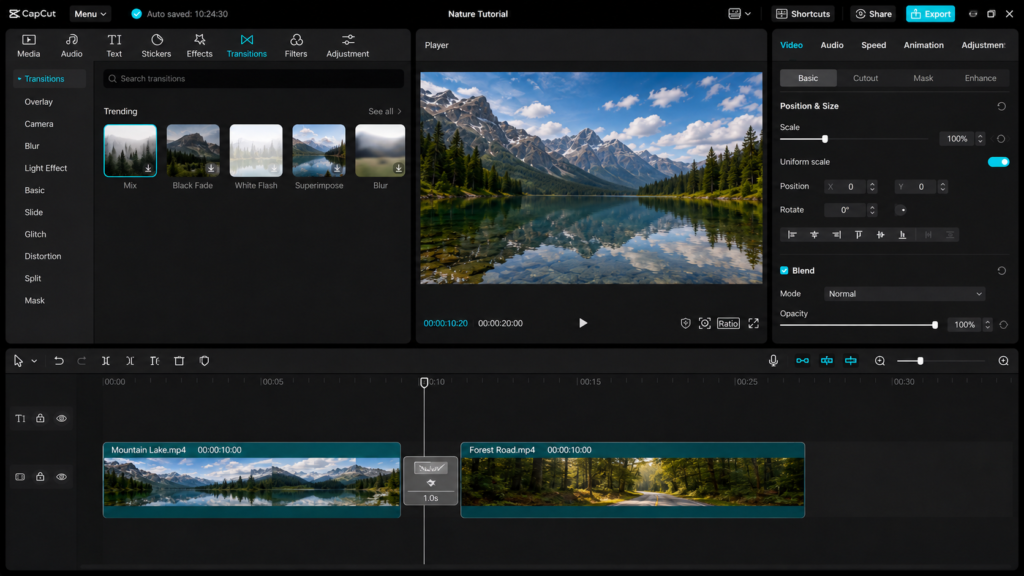
Beginners often make the mistake of using a different transition between every clip.
That usually makes a video feel less polished rather than more professional.
For your first project:
- Choose one subtle transition
- Use it consistently
- Keep the duration short
The same rule applies to filters and effects.
Consistency usually looks better than showing every effect CapCut offers.
Step 8: Review Your Project Before Exporting
Before exporting, play the entire video once from beginning to end.
Check for:
- Long pauses
- Black frames
- Misspelled text
- Music that is too loud
- Text that disappears too quickly
- Awkward transitions
- Clips that are out of order
- Unwanted elements at the end
CapCut maintains editable project drafts, while exporting creates a separate finished video file. Depending on your account and project setup, drafts may be stored locally or use CapCut’s cloud features.
This distinction is important:
Your CapCut project is not the final video.
The project contains your edits.
The exported file is what you can upload to YouTube, TikTok, Instagram, or another platform.
6. CapCut AI Features Worth Trying
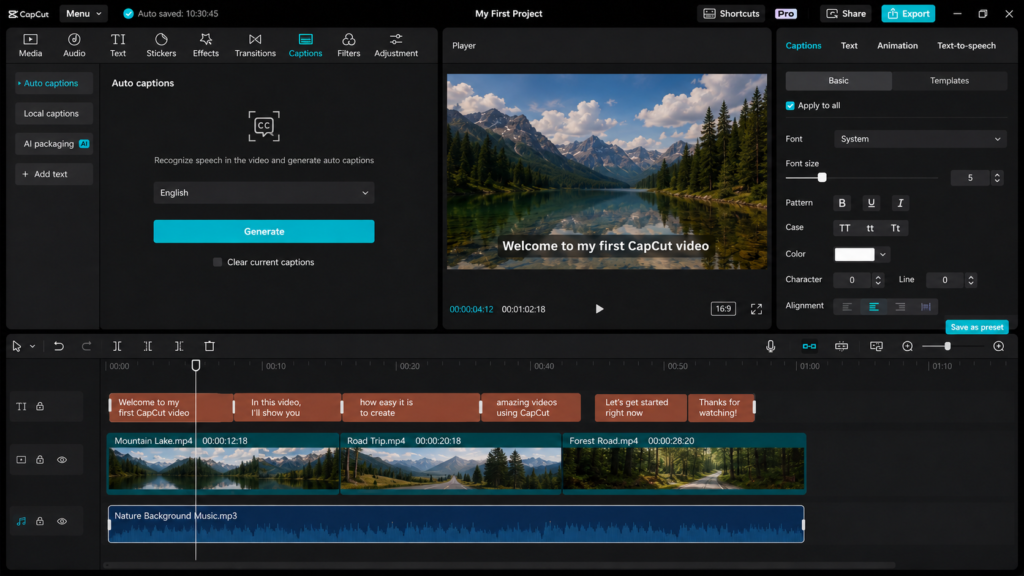
CapCut includes a growing collection of AI-assisted tools.
Depending on your account, location, platform, and plan, you may see tools such as:
- Auto captions
- Background removal
- Noise reduction
- AI voice tools
- AI image generation
- AI video tools
- Motion tracking
- Speech and audio enhancement
You do not need to use all of them.
For a beginner, three are particularly useful.
Auto Captions
Auto captions generate subtitles from spoken audio.
This can save a lot of time compared with typing every caption manually.
Always review generated captions before publishing.
Names, brands, accents, and technical terms can easily be misunderstood by automatic transcription.
Background Removal
Background removal can separate a person or object from the original background without requiring a traditional green screen.
Results depend heavily on the footage.
Clear lighting and strong contrast between the subject and background usually make the job easier.
AI Image Tools
CapCut also includes AI-powered visual creation features.
These can be useful for:
- Backgrounds
- Concept images
- Social media visuals
- Video inserts
- Creative experiments
If AI image creation is something you want to explore beyond CapCut, see our guide to the best AI tools for content creators for additional options.
Are CapCut AI features free?
Do not assume every AI feature is included in the free version.
Availability can change based on:
- Your country
- CapCut version
- Platform
- Current subscription
- AI credit requirements
- The specific feature
If a tool is available, try selecting it.
CapCut will normally indicate when a feature or asset requires Pro access or additional credits.
7. How to Export a Video from CapCut on PC
Once you are happy with the edit, click Export.
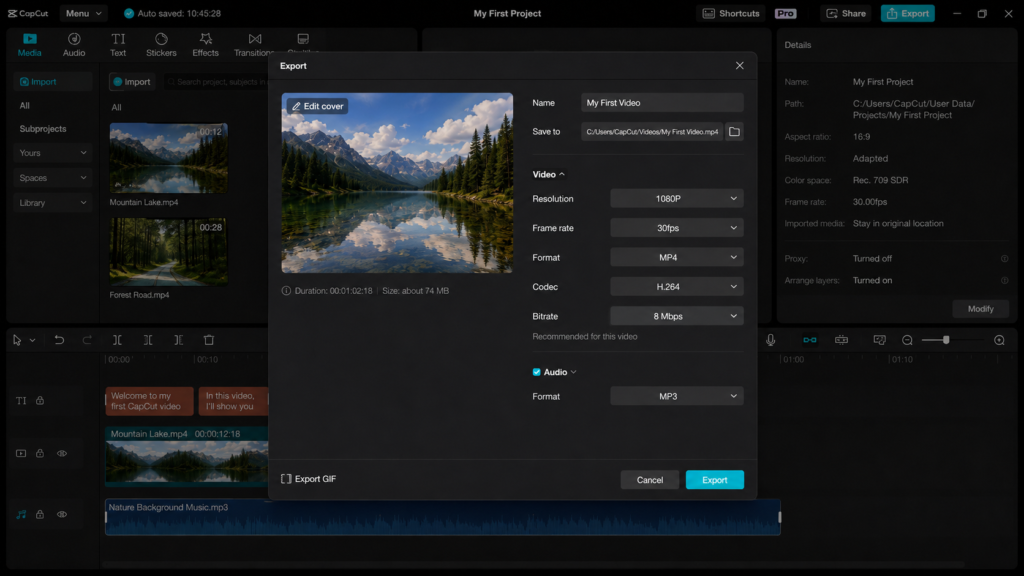
You will see several export options.
Resolution
For most beginner projects, 1080p is an excellent default.
CapCut Desktop can also support higher-resolution exports such as 2K and 4K on compatible systems and projects. CapCut’s Help Center currently states that desktop exports can support up to 4K at 60fps when the source footage and hardware support it.
Do not choose 4K simply because it sounds better.
If your source footage is 1080p, exporting at a higher resolution does not magically create genuine extra detail.
Frame rate
Whenever possible, match the frame rate of your source footage.
For example:
If your video was recorded at 30fps, exporting at 30fps is usually the simple choice.
Format
MP4 is a practical choice for most beginners because it is widely compatible with websites, phones, and social media platforms.
Bitrate
If you do not understand bitrate yet, CapCut’s recommended/default option is usually a sensible place to start.
Higher bitrate generally means:
- Larger file
- More data
- Potentially better image quality
Save location
Before starting the export, check where CapCut will save the file.
Choose a folder you can easily find.
Then click Export.
After the export finishes, CapCut provides an Open folder option that can take you directly to the saved video location.
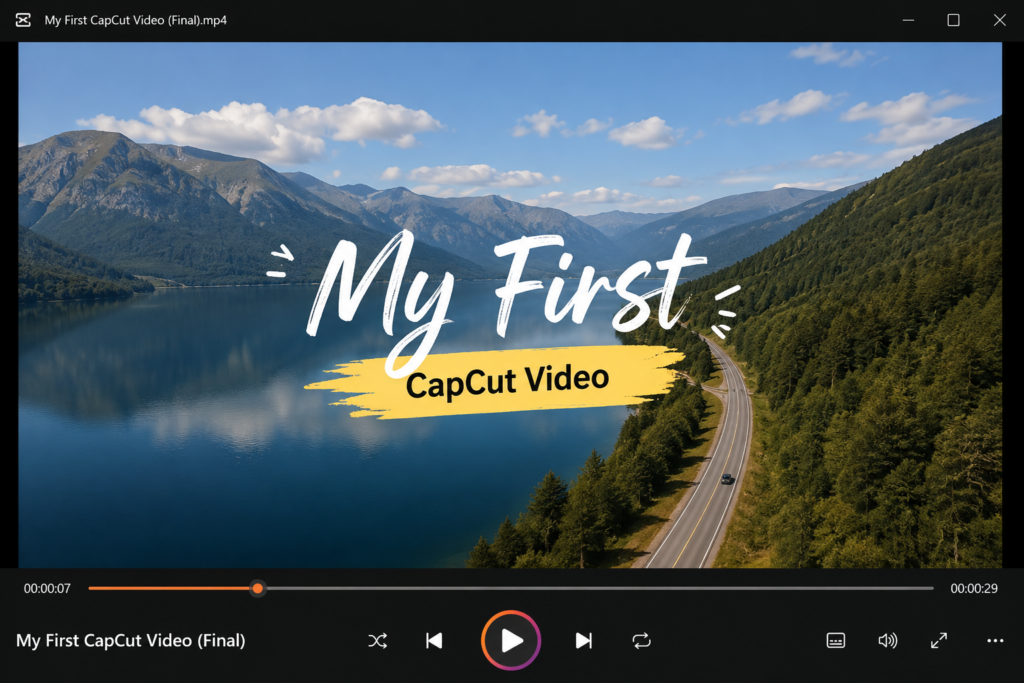
Congratulations — this file is your actual finished video.
8. Does CapCut Add a Watermark?
CapCut does not automatically place a watermark on every normal desktop export.
However, a watermark or branded ending may appear depending on the template or assets used.
CapCut explains that some templates can contain a branded ending clip, and projects containing premium elements may also trigger a Pro prompt during export.
Before exporting:
- Move to the end of your timeline.
- Look for an unwanted CapCut outro or branded clip.
- Remove it if appropriate.
- Check whether any assets are marked as premium.
- Preview the entire video.
- Export again.
This is another reason beginners should start with a simple manual project rather than building their first video entirely from complicated templates.
9. CapCut Free vs Pro on PC
For someone learning CapCut Desktop, the most useful comparison is Free vs Pro.
CapCut also offers a Standard subscription in some markets, but CapCut currently states that Standard subscription benefits are limited primarily to mobile and do not provide the same premium access on desktop. Users who want premium features across desktop and other platforms are directed toward CapCut Pro.
| Feature | CapCut Free | CapCut Pro |
|---|---|---|
| Basic video editing | ✅ Yes | ✅ Yes |
| Trim and split | ✅ Yes | ✅ Yes |
| Basic text and transitions | ✅ Yes | ✅ Yes |
| Free effects and assets | ✅ Yes | ✅ Yes |
| Premium assets | Limited | ✅ Expanded access |
| Advanced AI features | Limited / varies | ✅ More access |
| Cross-platform premium benefits | Limited | ✅ Yes |
| Cloud features | Availability varies | Expanded |
| Best for | Beginners and casual editing | Frequent and advanced creators |
CapCut regularly changes subscription packages, included AI credits, storage allowances, promotions, and regional pricing.
For that reason, I do not recommend choosing Pro based on an old price quoted in a blog article.
Instead, check the current CapCut plans and offers here and compare the price shown for your account and region.
Affiliate link.
CapCut itself recommends checking the subscription screen for the current price available in your region.
Should a beginner buy CapCut Pro?
Probably not immediately.
Start with the free version.
Use it until you can clearly identify something you cannot do without Pro.
For example, you might eventually want:
- A specific premium effect
- More AI tools
- Premium templates
- Additional creative assets
- Cross-device premium access
- More advanced workflow features
If you cannot name the feature you need, you probably do not need to pay yet.
10. Common CapCut Beginner Mistakes
Learning what not to do can save you a lot of time.
1. Starting with a huge project
Do not make your first edit a 30-minute video with 100 clips.
Start with 30 seconds.
2. Leaving dead air
Cut the awkward silence before and after someone speaks.
Shorter edits usually feel more intentional.
3. Making background music too loud
Speech should remain clear.
Music should not force viewers to struggle to understand the speaker.
4. Using too many transitions
One subtle transition used consistently is usually better than ten flashy ones.
5. Making text too small
Remember that many people will watch your video on a phone.
6. Putting text too close to the edge
Social media interfaces can cover important information.
7. Using effects before fixing the basic edit
First fix:
- Clip order
- Timing
- Audio
- Text
- Mistakes
Then add effects.
8. Confusing the project with the exported file
Your project is editable.
Your export is the finished video you share.
11. Quick CapCut Troubleshooting
CapCut will not install
Check:
- Your Windows version
- Available storage
- Internet connection
- Windows permissions
- Security software
- Whether you downloaded the correct installer
Always use CapCut’s official distribution channels rather than third-party download websites.
CapCut feels slow
Try:
- Close other demanding programs.
- Restart CapCut.
- Restart your computer.
- Make sure you have free storage.
- Reduce unnecessary effects.
- Test with lower-resolution footage.
- Update CapCut and your graphics drivers.
Higher-resolution footage and advanced effects place significantly more pressure on your hardware.
AI tools do not work
Check your internet connection first.
Some AI features use online processing and will not work correctly without access to CapCut’s online services.
Also check whether the feature requires Pro access or AI credits.
CapCut asks me to upgrade during export
Look for premium assets in your project.
CapCut says an export can trigger a Pro prompt when the project contains premium elements or settings.
Try removing or replacing them with free alternatives.
I cannot find my exported video
After exporting, use CapCut’s Open folder button.
If you already closed that screen, search your computer for the file name or check your Videos folder and CapCut’s default output location.
My project is missing media
Avoid moving, renaming, or deleting source files while you are still working on an important local project.
A simple organization system helps:
My CapCut Project
│
├── Video
├── Images
├── Audio
└── Exports
Keep everything in that folder until the project is finished.
My Recommendation
For a beginner learning desktop video editing in 2026, CapCut Desktop is one of the easiest places to start.
The biggest advantage is not a single AI feature or flashy template.
It is the fact that you can understand the basic editing workflow relatively quickly:
Import → Timeline → Trim → Text → Audio → Export
Start with the free version.
Do not buy Pro on your first day just because premium effects look attractive.
Create several videos first.
After a few projects, you will know whether the free tools are enough or whether specific Pro features would genuinely improve your workflow.
If you decide you need those features, you can check the current CapCut Pro options here.
Affiliate link.
Most importantly, do not spend your first week trying to learn every button.
Learn the five skills that matter first:
- Importing
- Arranging clips
- Cutting
- Adjusting audio
- Exporting
Everything else can come later.
Conclusion
Learning how to use CapCut on PC for beginners becomes much easier once you stop thinking of video editing as one complicated task.
It is really a short sequence:
Choose your format → import clips → arrange them → remove mistakes → add text and audio → export.
For your first project, create something deliberately small.
Try:
- 30 seconds
- Three clips
- One title
- One music track
- One transition
Then export it.
Finishing a small project will teach you more than spending hours exploring effects without producing a finished video.
Once you can complete that workflow confidently, you can start experimenting with captions, AI tools, background removal, advanced audio, effects, and larger projects.
FAQ
Is CapCut free on PC?
Yes. You can use CapCut Desktop without purchasing Pro and access its basic editing workflow, including tools for cutting clips, working with text, audio, transitions, and free assets.
Some advanced features, AI tools, templates, effects, and assets may require CapCut Pro.
Do I need CapCut Pro as a beginner?
No.
Most beginners should learn the free version first.
Upgrade only when you encounter a specific Pro feature that you genuinely need.
Does CapCut add a watermark on PC?
Not automatically on every normal export.
Certain templates may contain a branded ending clip, while premium assets can also affect your ability to export without upgrading.
Check the end of your timeline and any premium elements before exporting.
What are the minimum requirements for CapCut on Windows?
CapCut currently lists Windows 10 or later, an Intel Core i3 or equivalent processor, at least 4GB of RAM, compatible graphics, and sufficient storage among its minimum Windows requirements.
Stronger hardware is recommended for larger projects and high-resolution footage.
Can CapCut export 4K video on PC?
CapCut Desktop supports 2K and 4K export on compatible projects and systems. CapCut states that desktop export can reach 4K at 60fps when the computer and source footage support it.
If you are a beginner working with ordinary 1080p footage, however, 1080p is usually a simpler and perfectly practical starting point.
Which CapCut AI features are free?
There is no single answer that applies permanently to every CapCut account.
AI availability can depend on your platform, region, app version, subscription, and AI-credit requirements.
Try the feature inside your account and check whether CapCut marks it as free, Pro, or credit-based.
Do I need an internet connection to use CapCut?
Not for every basic editing task.
However, cloud-based services, account syncing, online resources, and several AI features require internet access.
What is the difference between saving a CapCut project and exporting?
Your project contains the editable timeline, clips, effects, text, and other editing decisions.
Exporting creates the finished video file that you can play outside CapCut and upload to websites or social platforms.
Always remember:
Project = editable work
Export = finished video
Should I edit my first video in 4K?
Probably not unless your footage and project actually require it.
1080p is easier to work with, creates smaller files, and places less demand on your computer.
Once you are comfortable with the editing process, you can experiment with higher resolutions when they make sense.
Is CapCut good for YouTube beginners?
Yes.
CapCut’s relatively simple timeline, text tools, captions, audio editing, effects, vertical and widescreen formats, and AI features make it accessible to beginners creating both standard YouTube videos and Shorts.
If you are comparing tools for a broader creator workflow, you can also explore our guide to the best AI tools for content creators.
Enjoyed this guide? Support ByteTony and help us create more simple, beginner-friendly tech guides.
☕ Support ByteTony