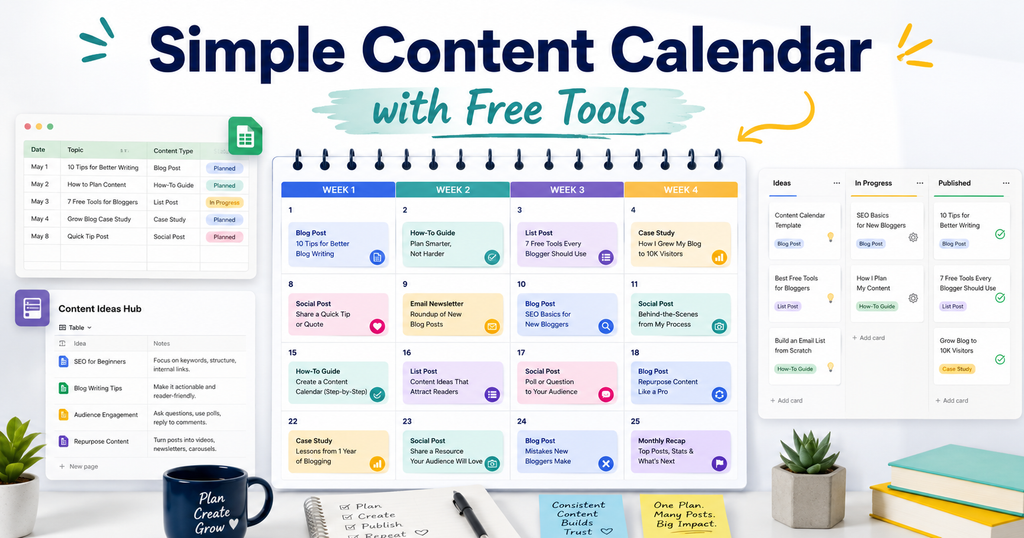
Most people don’t stop publishing because they run out of ideas. They stop because publishing day arrives, nothing is ready, and deciding what to write becomes another task they can postpone.
A content calendar fixes that problem.
And for a beginner blogger, it does not need to be complicated. A useful free content calendar can be built with six columns, four weeks of planned content, and a short weekly review.
You do not need an expensive content management platform. Google Sheets is enough for most beginners. Notion is a good alternative if you prefer a visual calendar or board, while Trello works well if you naturally think in workflow stages.
This guide shows you exactly what to track, how to build a simple content calendar in Google Sheets, how to create the same system in Notion, and which free tool makes the most sense for your workflow.
Table of Contents
The 6 Columns Every Content Calendar Needs
Before choosing an app, decide what information your calendar actually needs to store.
For a solo blogger or content creator, start with these six columns:
| # | Column | What goes in it | Example |
|---|---|---|---|
| 1 | Publish date | The date you plan to publish | Thu 12 March |
| 2 | Working title | A temporary title you can improve later | Cheap microphones for beginners |
| 3 | Target keyword / topic angle | The main search term or angle | best budget USB microphone |
| 4 | Format | Blog post, newsletter, video, short-form, etc. | Blog post |
| 5 | Status | Idea → Drafting → Editing → Scheduled → Published | Drafting |
| 6 | Link / notes | Published URL, research links, or short notes | 3 sources saved |
That is enough to run a simple publishing system.
A few rules make these columns much more useful.
Treat the publish date as a commitment. If the date is obviously unrealistic, choose a later one instead of creating a calendar you already expect to ignore.
Do not waste time perfecting working titles. A working title only needs to tell you what the article is about. You can improve it when you edit the post.
Give each article one primary keyword or angle. A post can naturally cover related terms, but choosing one main target helps prevent the article from drifting into several unrelated topics.
If keyword research is still new to you, these free SEO tools for bloggers can help you find topic ideas and evaluate keywords without immediately paying for an SEO platform.
Keep the status list short. Five stages are enough for most solo creators:
Idea → Drafting → Editing → Scheduled → Published
You do not need twelve different labels describing every tiny stage of the writing process.
Use the final column as a record of useful information. Before publication it might contain research links. After publication, add the live URL. Over time, that column becomes a simple archive of what you have actually produced.
What you should leave out at first
It is tempting to add more columns for:
- Word-count targets
- Time estimates
- Assignees
- Performance metrics
- Social promotion
- Subtasks
- Priority scores
Most beginners do not need them.
Every extra field creates something else that has to be maintained. Start with the six-column version and add another field only when you repeatedly find yourself needing it.
If a second person eventually joins your workflow, for example, an Owner column may become useful. Until then, keep the calendar optimized for one person.
How to Build a Free Content Calendar in Google Sheets
Google Sheets is the easiest place to start because it behaves like a normal spreadsheet, works in a browser, and does not require learning a full project-management system.
You can build the entire calendar in around twenty minutes.
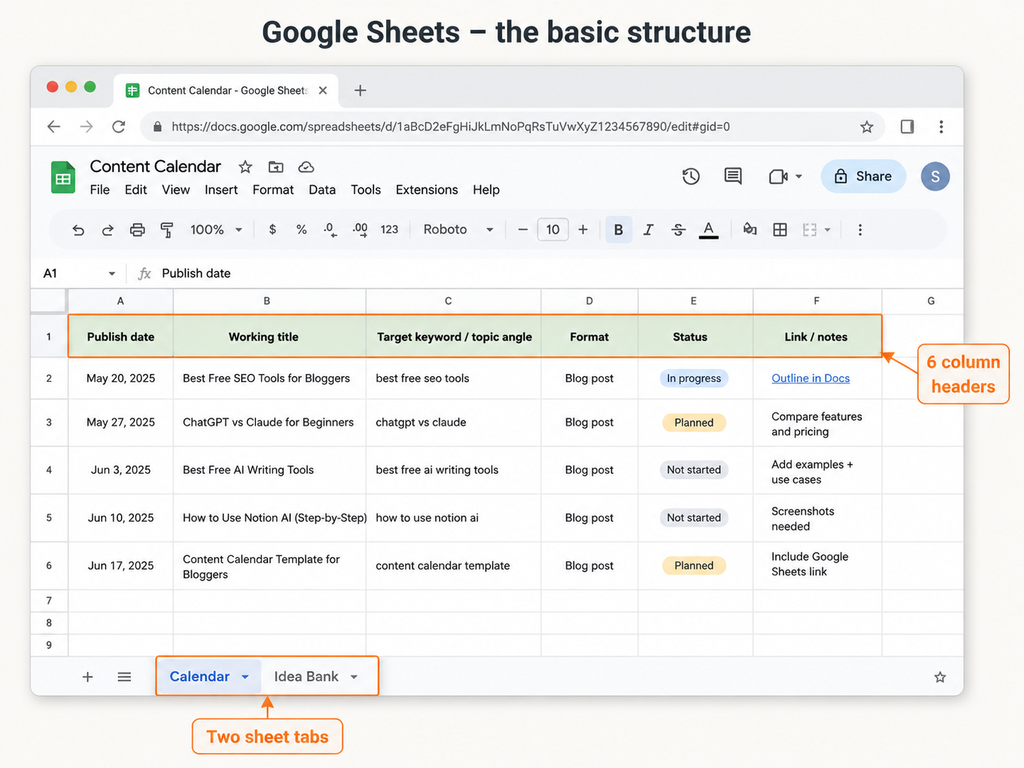
Step 1: Create Two Tabs
Open a blank Google Sheet and create two tabs:
CalendarIdea Bank
That is all you need.
The Calendar tab contains posts you actually intend to publish.
The Idea Bank contains topics you might publish later.
Keeping the two separate matters because an idea is not the same thing as a commitment.
In the Calendar tab, add these headers to the first row:
| Publish date | Working title | Target keyword / topic angle | Format | Status | Link / notes |
|---|
Then freeze the header row:
View → Freeze → 1 row
Now the column names remain visible as your calendar grows.
Step 2: Create a Status Dropdown
Typing statuses manually eventually creates variations such as:
- Draft
- drafting
- In draft
- Writing
- Almost drafted
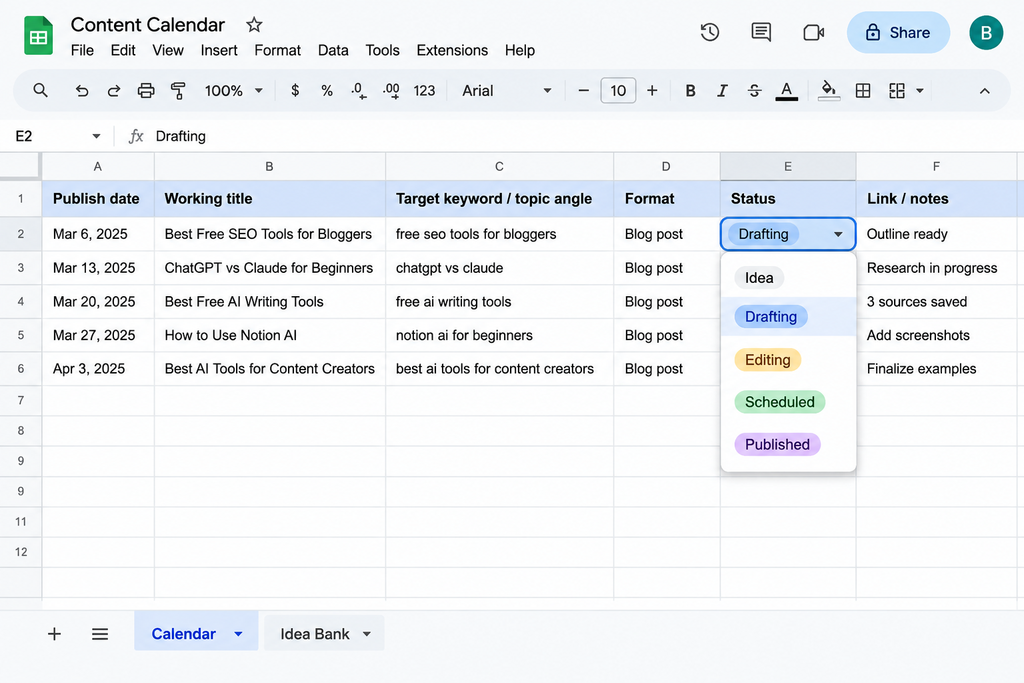
A dropdown prevents that.
Select the cells in your Status column and go to:
Data → Data validation → Dropdown
Add these five options:
- Idea
- Drafting
- Editing
- Scheduled
- Published
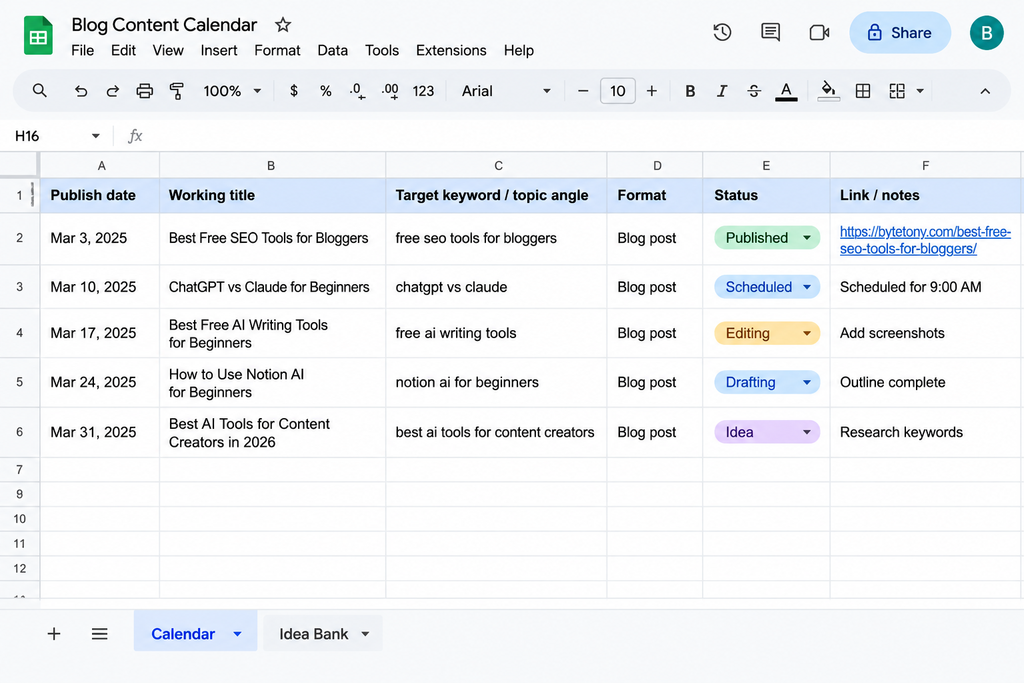
You can also apply conditional formatting so completed posts are easier to recognize visually.
For example, you might highlight Published entries and use a different style for posts that are still at the Idea stage.
The goal is not to make the spreadsheet attractive. It is to make its current state understandable in a few seconds.
Step 3: Fill the Idea Bank Before Scheduling Anything
Do not start by choosing dates.
Start by creating enough ideas that you have something useful to schedule.
Open the Idea Bank tab and write down 20 to 30 possible topics without judging them too heavily.
Useful prompts include:
- Questions beginners repeatedly ask about your topic
- Problems you have personally searched for
- Mistakes people make in your niche
- Comparisons between popular tools or approaches
- Tutorials that competitors explain poorly
- Follow-up questions from articles you have already published
Do not worry if some ideas are weak. The Idea Bank is supposed to contain possibilities, not finished editorial decisions.
AI can also help at this stage.
For example, you can give an AI assistant five broad subjects and ask it to generate related beginner questions, comparisons, mistakes, tutorials, and long-tail angles.
If you are deciding which assistant to use, this comparison of ChatGPT vs. Claude for beginners explains the practical differences.
You can also explore these free AI writing tools for beginners if you want more options.
The important distinction is that AI should expand your pool of possibilities, not decide your publishing strategy for you.
It can help you generate 25 ideas.
You still decide which four are actually worth publishing.
Step 4: Plan Only the Next Four Weeks
Now return to the Calendar tab.
Choose a publishing frequency you can realistically maintain.
For a beginner blogger, once a week is often more useful than starting with an aggressive schedule you abandon after two weeks.
Move your strongest ideas from the Idea Bank into the Calendar and assign real publishing dates.
Plan four weeks in detail.
Not six months.
You can keep loose ideas for future months, but your detailed calendar should remain short enough to change when you learn something new.
After your first few articles, you may discover that:
- One topic attracts much more search traffic than expected.
- Readers ask a question you had not considered.
- A comparison article performs better than a tutorial.
- A product or tool changes.
- You simply lose interest in a planned topic.
A six-month calendar can turn those discoveries into inconveniences.
A four-week calendar gives you room to react.
Keep One Monthly Slot Flexible
You do not need to leave an entire publishing week empty.
Instead, make one planned article each month flexible.
Give it a tentative topic, but be willing to replace that topic if something more useful appears.
For example, you might replace it because:
- A tool releases an important update.
- A new question starts appearing repeatedly.
- Another article unexpectedly performs well and deserves a follow-up.
- A timely topic becomes relevant to your audience.
You still have four planned publishing dates, but the calendar does not become rigid.
Step 5: Add a 15-Minute Weekly Review
A content calendar only works if you look at it.
Choose one fixed time each week and spend about fifteen minutes reviewing the next seven days.
Ask three questions:
- What did I publish last week?
- What slipped or changed?
- What is the single most important publishing commitment this week?
That is enough.
You can create a recurring reminder in Google Calendar so the review appears automatically every week.
If reviewing the calendar regularly takes an hour, the system has probably become more complicated than it needs to be.
The 10-Minute Notion Version
Google Sheets is the simplest starting point, but some people find spreadsheets difficult to scan visually.
Notion lets you store the same information in a database and view it in different layouts.
Its Free plan is currently $0 for individuals and includes databases, which is enough for the basic setup described here.
Here is the simple version.
Step 1: Create the Database
Create a new Notion page.
You can create a database from a new page by selecting a Table database, or create an inline database on an existing page using /Table view. Notion also supports the /database command.
Do not accidentally create a basic Simple Table.
You want a database, because database properties are what allow dates, statuses, filters, and multiple views to work.
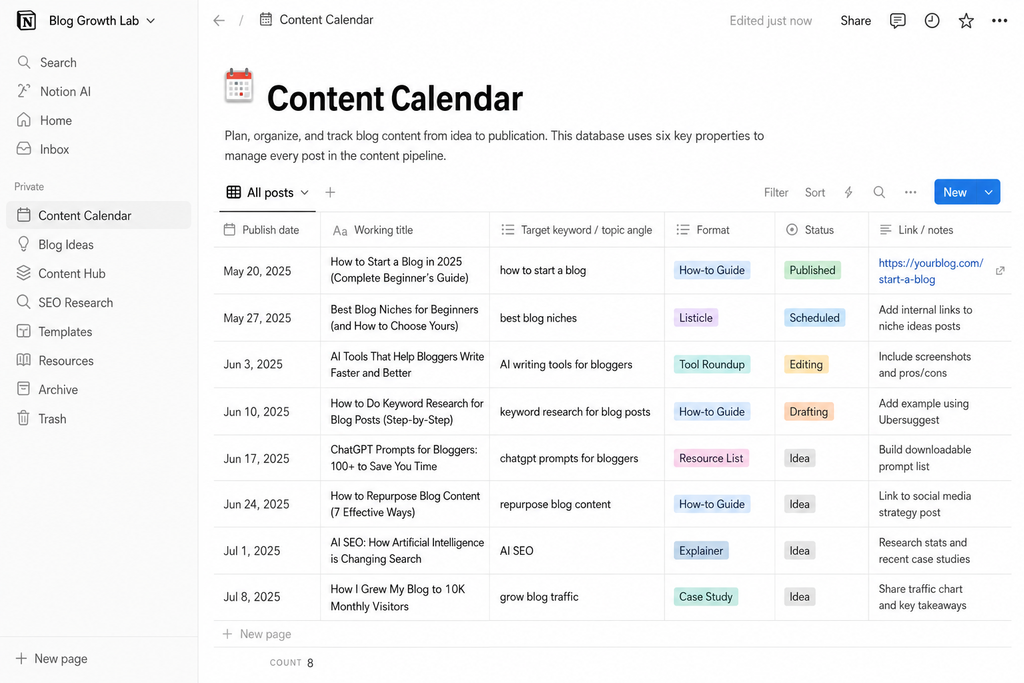
Step 2: Add the Same Six Properties
Create properties matching the Google Sheets version:
- Publish date
- Working title
- Target keyword / topic angle
- Format
- Status
- Link / notes
Set Publish date as a Date property.
Set Status as a status or select-style property that represents:
Idea → Drafting → Editing → Scheduled → Published
Step 3: Add Calendar and Board Views
Your table remains the main database.
Now create another view and choose Calendar.
Notion’s Calendar view displays entries according to a Date property, which is why setting Publish date correctly matters.
Then create a Board view grouped by status.
You now have the same content displayed in three useful ways:
Table view — best when you want to see all details.
Calendar view — best when you want to see publishing dates.
Board view — best when you want to see which articles are still ideas, being drafted, being edited, scheduled, or finished.
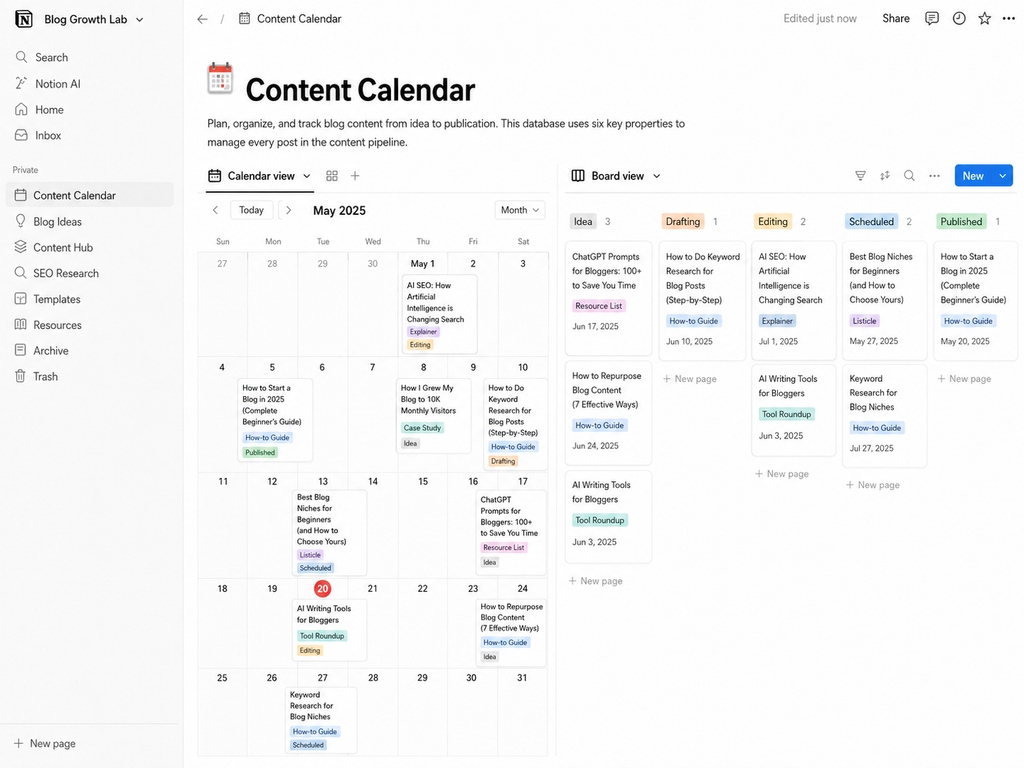
You do not need separate databases for each view. They are simply different ways of looking at the same information.
If you already use Notion and want to understand its AI features as well, see this beginner guide to how to use Notion AI.
Just avoid turning your content calendar into a Notion-building hobby.
A beautifully designed dashboard that you never publish from is worse than an ugly spreadsheet you actually use every week.
Google Sheets vs. Notion vs. Trello
All three tools can help organize a publishing workflow, but they encourage different ways of thinking.
| Tool | Best for | Learning curve | Calendar-style planning | Main limitation |
|---|---|---|---|---|
| Google Sheets | Beginners who want the fastest possible setup | Low | Dates live in rows rather than a visual month grid | Less visual than dedicated planning tools |
| Notion | People who want table, calendar, and board views of the same data | Moderate | Yes | Easy to over-customize |
| Trello | People who think primarily in workflow stages | Low | Trello’s dedicated Calendar view requires Premium or Enterprise | Less suited to free month-at-a-glance planning |
Trello’s official documentation currently lists Calendar view as a Premium or Enterprise feature rather than a Free-plan view.
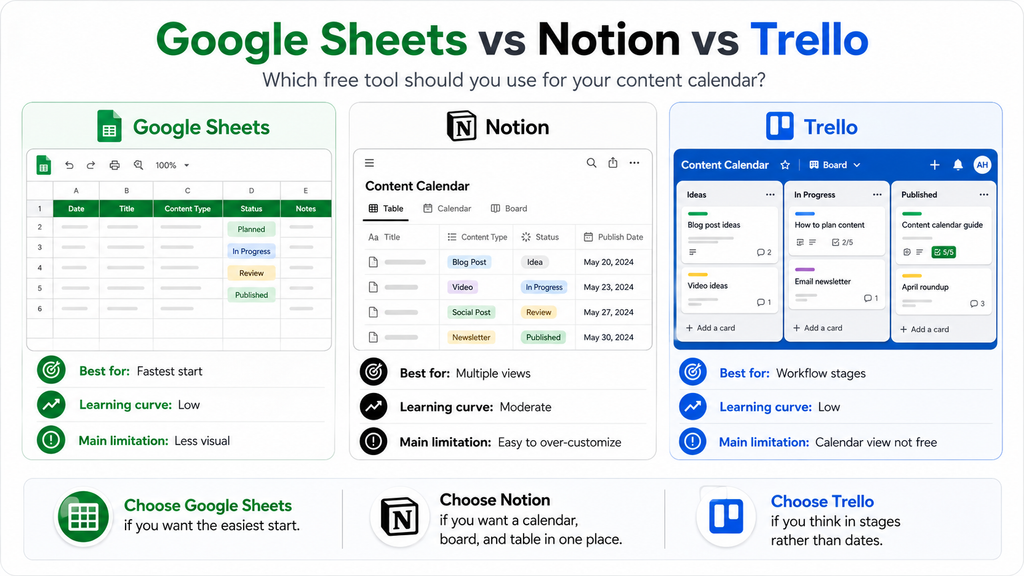
Choose Google Sheets if you want the easiest start
Use Google Sheets if you want to open a file and begin planning immediately.
It is especially good when:
- You already understand spreadsheets.
- You mainly publish on one platform.
- You want complete control over your columns.
- You do not care about a visual monthly calendar.
For most absolute beginners, this is the option I would start with.
Choose Notion if you want multiple ways to view the same calendar
Notion becomes more useful when you like switching between:
- A database
- A visual calendar
- A status board
It requires slightly more setup than Google Sheets, but you do not have to rebuild the system later simply because you want a different visual layout.
For a solo creator who likes visual organization, it is probably the strongest free option overall.
Choose Trello if stages matter more than dates
Trello works naturally as a pipeline.
You can create lists such as:
Idea → Drafting → Editing → Scheduled → Published
Then move each article card from one list to the next.
That makes progress extremely easy to understand.
The trade-off is that if your main goal is a free visual month-at-a-glance publishing calendar, Trello is less attractive because its dedicated Calendar view is not included in the Free plan.
You Probably Do Not Need More Tools Yet
Content planning tools are easy to collect.
You can have a spreadsheet, project manager, AI assistant, keyword tool, note-taking system, social scheduler, and analytics dashboard before you have ten published articles.
That usually creates more administration, not more content.
Start with one calendar.
Use it consistently for a month.
Then add another tool only when you can name the specific problem it solves.
The same rule applies to AI.
There are now tools for brainstorming, outlining, research, rewriting, images, video, repurposing, and automation. Some are genuinely useful, but you do not need all of them at the beginning.
If you want to see what is actually worth exploring, this guide to the best AI tools for content creators in 2026 gives you a broader overview.
Your content calendar should remain the place where publishing decisions live.
The tools around it should make those decisions easier to execute.
Publish Consistently Before You Add Another Channel
One of the easiest ways to make a new content calendar complicated is to plan several platforms immediately.
For example:
- Two blog posts
- Three newsletters
- Five social posts
- Two YouTube videos
- Daily short-form content
That may look productive inside a calendar.
It can also create five partially maintained channels.
If you are starting from scratch, build a reliable publishing rhythm on one primary platform first.
Once that system works, you can repurpose strong content into other formats.
One useful article can become:
- A newsletter
- Several social posts
- A short video
- A follow-up article
- A comparison post
That is usually more sustainable than treating every platform as a separate content machine.
If you eventually add another channel, you do not necessarily need another calendar.
Add a Channel column to your existing system and filter it when needed.
Keep one source of truth for your publishing schedule.
How Long Should You Plan Ahead?
For most beginner bloggers, a useful rule is:
Plan four weeks in detail and keep the next few months as loose ideas.
Your next month should have:
- Real titles or clear working titles
- Real publishing dates
- Target topics
- Current statuses
Future months can remain broader.
For example:
Next month: four specific articles.
Month two: themes and promising keywords.
Month three: possible topic clusters.
This gives you enough direction to avoid deciding what to write every morning without locking yourself into topics that may stop making sense.
What to Do After an Article Is Published
Do not remove a row when a post goes live.
Change its status to Published and add the live URL.
That simple habit gradually turns your content calendar into a publishing archive.
Later, you can look through it to see:
- How consistently you publish
- Which topics you have already covered
- Which subject areas need more content
- Which older posts may need updating
- Which articles could link to one another
This is also where your calendar starts supporting SEO.
When you publish a new article, look at older relevant posts and ask whether they should link to it. Then check whether the new article should link back to other useful resources on your site.
A content calendar does not need to become a full SEO dashboard, but keeping a reliable list of published URLs makes internal linking much easier.
Start With Four Weeks
You do not need the perfect content calendar.
You need a system simple enough that you still use it after the excitement of setting it up disappears.
For most beginner bloggers, that means:
- Six useful columns
- One Idea Bank
- Four weeks of planned content
- Five simple status values
- One flexible monthly topic
- A fifteen-minute weekly review
If you want the fastest possible start, use Google Sheets.
If you prefer seeing the same content as a table, calendar, and board, use Notion.
If you naturally think in workflow stages rather than publishing dates, Trello is a good alternative.
Then stop comparing tools and start filling the calendar.
Open your chosen app, create the six fields, choose the next four publishing dates, and add your first topic.
The system becomes useful when the first article gets published—not when the calendar looks perfect.
Enjoyed this guide? Support ByteTony and help us create more simple, beginner-friendly tech guides.
☕ Support ByteTony